Wednesday, March 23, 2011

Simon is finally finished!

I am happy to say that Simon is finally off the drawing board and I think he looks terrific!  After completing his copper name tag and green collar I started back in on his orange tabby fur...work a bit with cream, then swap out a few strokes of Sandbar, then some PolyChromos Raw Umber, maybe a few strokes of Light Umber, Sepia, Sienna Brown, Chocolate or Burnt Sienna...and then add some more Cream or White and start it all again, sharpening every few strokes to make sure that each hair is well defined.

He is almost finished here, I have completed all but the final "smoothing and polishing" to the fur on the right side of his chest.  The last step for this area was to finally pick up the Colourless Blender Pencil  and do a light, all over scumble...following the direction of the pencil strokes. I use Normal pressure to apply the blender, and just smooth and blend the pencil layers together. Then, since I have not used heavy pressure that would compact the tooth of the paper I can still go back and apply a few random strokes of cream, white or one of the darker values and then everything just pops!

His whiskers are added - gee, he has a lot of whiskers and some of them start out black and then turn white along the length. I cheat and use thinned acrylic paint and a very fine liner brush to paint the whiskers...so much easier than trying to indent and keep the white pencil white.

a close up of his pretty green/yellow eyes

and another close up of his copper name tag and the soft blended multi layered appearance of his fur.

I hope you like Simon as much as I enjoyed working on him!

Cheers!
J

Friday, March 18, 2011

Coloured Pencils and Paul Simon...

As pretty as the little pansy ATC card that I posted previously is, it was created as a specific project to teach beginner students about working with coloured pencils and I used a very limited palette of only the 3 primary colours plus white and a blender.

My usual method is to incorporate as many of the pigment colours available to me as is necessary and depending on the subject I am rendering that could be anywhere from 10 to 20 to 30 or more different pencils! My goal is rich, saturated, full spectrum layers of colour that accurately reflects the true colour of the subject no matter what it is I am rendering.

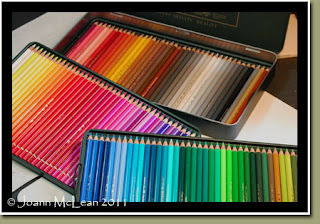
I have a lot of coloured pencils to choose from, I currently work from full sets of 3 different brands of pencils. Prismacolors are my go-to brand and come in 132 luscious colours. They are a wax based pencil.

Aren't they gorgeous! Who wouldn't want to use all of them?

I also use Polychromos which are an oil based pencil. I had to order the full set from the US when I bought these because I hadn't been able to find them locally.... and then of course I hoarded them since they were difficult for me to replace, but I have recently found a local art store in K-W that carries them in open stock!   mmmmm 120 soft buttery colours...

and I have been using wax based Derwent Coloursoft pretty well since they came on the market in Canada ...they seem to be becoming very popular and are available at many locations open stock. They come in 72 colours.


I like to keep my sets full at all times as reference to what colours are available to me and then I know for sure that I have at least one extra pencil if I need it. I also have a leather zip travel case of Prisma's that I usually work from and then extras of all brands I keep in a carousel in my studio.


.....getting back to what I was originally going to talk about today :-)

This is (Paul) Simon who has been on my drawing board since before Christmas! He is a family pet, and I unfortunately had to put him aside to work on other projects. I usually don't keep too detailed of records while I am working unless I plan to use the piece for demonstration purposes

...for Simon I noted what colours I had used for his nose, 13 in all, and for his eyes 14 colours in all. Now I am into the later stages of his beautiful fur and depending on the colour and value (creamy or white, beige or tan, orange or golden and light or dark) I usually have between 5-8 colours in my hand constantly changing with every few strokes. There are about 15 fur colours in one box I where I keep pencils in use.  


My list has 40 different pencils I have used so far on Simon, I am now working on his collar and metal name tag and I know that I have pulled a few greens and others out of my case to render the chrome and copper accurately.

I will show you a couple of updates of Simon as I complete him, he has been "half a cat" for way to long, I want to get him done and framed so I can scratch him off my to do list and get going on something new!

Cheers!
J

Wednesday, March 16, 2011

New Page and Free Projects!

Just finished adding a new page to my blog that lists the upcoming classes and seminars that I am booked to teach so far this year. There are now page tabs along the top underneath my banner, if you are interested in taking a coloured pencil class with me or would like to arrange a class in your area go have a look!

When I decided to start teaching again I made a pledge to my students that I would be here to support them along their journey by continuing to make myself available to them after the class is over.

I know that it is difficult for those who are new to using coloured pencils to find suitable projects that they can work on to improve their skills. Not everyone is capable of taking a photograph and turning it into a work of art....you can see it in your head but sometimes transfering your "vision" onto paper just doesn't work out the way you hoped it would - everyone, including me, has a file of "mistakes" that don't quite measure up. 

Upon occasion and depending how busy I am with other demands, I will be publishing a series of small coloured pencil projects that will be absolutely free for the asking to any of my students who have taken a CP class from me in 2011 and beyond.

The Pansy ATC will be one such project and will be available after April 16th for non-students and is available right now to anyone who has already taken a class from me in 2011.


- the e-packet will contain the original photo reference, work in progress photos, the line drawing and the list of coloured pencils that I used to complete the project referenced to each progress photo, and of course a photo of my finished rendering.
If you haven't been able to take a class from me but would still like to try out one of my projects, I will decide on a nominal fee that you can PayPal.

Check back often or become a follower, I have a few little things that you might like to try!

Cheers!
J

Sunday, March 13, 2011

BEST IN SHOW!

                                   SPRING RETURNS
I have been putting together the mechanics of this blog for about a week now, polishing my photoshop skills and relearning how to do a bit of coding, which wasn't my fav thing to do when I had a website and still isn't, and I really hadn't planned on posting until I have everything set the way I want it...but...something happened this weekend that I just have to shout about!
I entered 3 paintings into a very prestigous juried fine art show, one that I visited last year for the first time and decided then that I just might attempt to have something to show this year. Although it was down to the last minute on the 3rd piece and I was still fussing with it in the morning before we popped it into a frame and took it over to the show I did manage to get them entered under the deadline.
Guess what?
I won BEST IN SHOW!
Can you believe it?
I am still going around saying "you must be kidding" even though I have been awarded my prize and had my picture taken beside my winning painting. 
...and wouldn't you know it, the piece that won is the painting I just finished!
Here's a close up of the painting, the organizer of the show mentioned to me that the judge felt that she could almost reach out and touch the feathers on the Rose Breasted Grosbeak, that they were that realistic....I'm glad I took the time that I did (it took days to layer it all) but as they say "the ends justify the means" and if I hadn't know that I was successful with my rendering of this fine fellow he would have never made it to the show.
Ironically, I took the series of ref photos that I used for this painting at "Pinery Provincial Park" which is right across the road from the gallery!

Oh! I guess I should remember to tell you about the show.... It is called "PAINT ONTARIO" and is held at the Lambton Heritage Museum on HWY #21 just south of Grand Bend Ontario. This is the 15th year for the show and it is billed as "Canada's Premier, Juried Art Competition, Exhibition and Sale of Representational Art"
http://www.paintontario.com/
If you get a chance go, there are entrys from artists from all across Canada and every piece is awesome! On now until April 3rd, 11 to 5 daily.

This photo doesn't do much for it, I just took a few shots...didn't want to be too obvious with my picture taking! I get to keep the plaque too!

 here are the other winning entries along with mine.

and here I am standing with my winning entry....I was a bit distracted trying to instruct my husband on how to use my camera while remembering to "smile for the camera"...I'm not often on the other end of my Nikon!
So I guess that's it for my first blog post, it wasn't what I had carefully rehearsed in my head but gee...even better I'm thinking!  I'll be back soon with a work in progress and bit more info on what I hope to do with this blog, right now it's time for a glass of wine and some time "out of the studio" with my #1 critic and most ardent supporter!
Cheers!
J